The low back consists of various thick muscles that range between the bottom of the rib cage, to the top of the glutes and hips, that encompasses the lumbar spine.
Suffering from back pain is something many of us are all too familiar with. Whether it is chronic, acute, or episodic back pain, leaving it untreated can result in expedited symptoms, degeneration, and permanent changes.
With lower back pain, it is often believed that it is best to rest and relax. On the contrary, the best treatment is actually to continue moving. Movement and exercise increases blood flow and oxygen circulation to muscles in the lower back, reducing stiffness and promoting healing within the area.
In today’s blog, we will be going over exercises and home remedies that can be used to relieve and prevent low back pain.

Common Causes
Low back pain can be induced by various factors. The most common causes include poor posture, unsafe lifting mechanics and sedentary behaviour.
Pain in the lumbar region of the spine can often be caused by weak glute, hip flexors and abdominal muscles that anchor to the spine and provide support. These muscles play a big role in supporting the spinal column during walking, running and sitting movements. When weakend, these muscles can induce improper alignment of the spine, leading to increased stiffness, pain and chance of injury.
Risk Factors
Some people are more likely to experience lower back pain than others. Some risk factors include:
- Age: As you age, the areas between the vertebraes that cushion and absorb shock (known as intervertebral disks) degrade, becoming more sensitive and susceptible to injury. This is most common between ages 30-50, with increased degeneration as aging continues.
- Disease: Typically steming from a familial history of disorders such as osteoarthritis, scoliosis, spinal stenosis, degenerative disc disease and spondylosis. Additionally, diseases decreasing a person’s activity level cause weakening of muscles and can contribute to an unbalanced posture/neutral position and increase risk of injury.
- Health: Being overweight can lead to excessive pressure on the spinal disks. Sedentary behaviour also contributes to weakened and elongated muscles causing improper pelvic positioning. Most commonly, this induces pelvic tilt, where the lower back and hip flexor muscles are tight while the abdominal and glute muscles are weak and not active.
- Occupation and Lifestyle: Jobs and activities that involve repetitive or heavy lifting/bending can strain the lower back muscles and leave the body more vulnerable to injury. Often times, this can result in chronic back pain and compensations made at the knees, hips, or upper body.
Red Flags to Lookout For
Although most low back pain instances subside within a few weeks, here are a few signs to watch out for that indicate when to consider a visit to your health care provider:
- Severe pain that spreads down one or both legs
- Weakness, numbness or tingling that travels down one or both legs
- Bowel or bladder dysfunction
- Loss of sensation when you wipe after using the bathroom
- Loss of muscle strength in lower extremities
- Pain worsening or persisting for over four weeks
Best Exercises to Fix Back Pain
Exercises for lower back pain focus around increasing core and lower body muscular strength to assist in supporting the lumbar spine. These strengthening exercises are intended to improve posture, alleviate tension and relieve pain within the lower spine.
The following exercises are fairly simple and can be completed at home. They may also be modified to individual fitness level. We recommend doing these exercises on a yoga mat for some provided comfort.
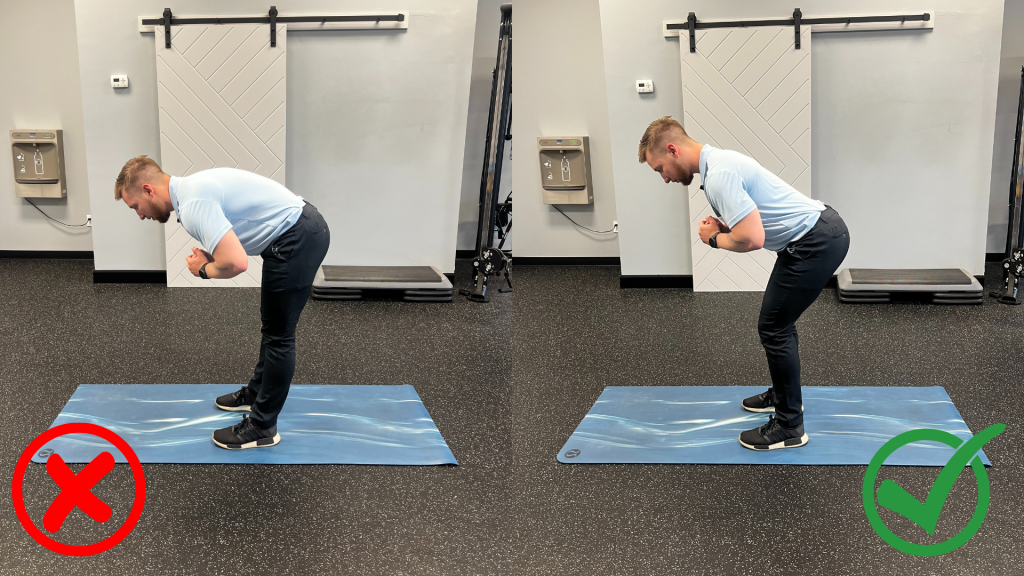
Hinge Variations
Hinges are essential in our every day lives. From picking up things from the floor to sitting down to doing laundry, we use hinges all the time. It is important to have good hinging form because without it, we place excessive loads onto our lower backs instead of using the strong muscles of our lower body. The basic hinge involves movement solely at the hips.
- Starting with feet flat on the floor and hip width apart, enter a neutral position: the glute and core muscles should be engaged, with shoulder blades pulled back and down.
- While continuing to brace your core, push the butt back, allowing your upper body to naturally lean forward while maintaining a neutral spine.
- To return to the upright position, think about driving your hips forward and pushing the ground away while still keeping the core engaged. Using this technique will ensure you are using the gluteal muscles to drive the movement, as opposed to moving from the spine and putting excessive load on the low back.
In the images below, we have demonstrations of incorrect and correct hinging positions.
Squat
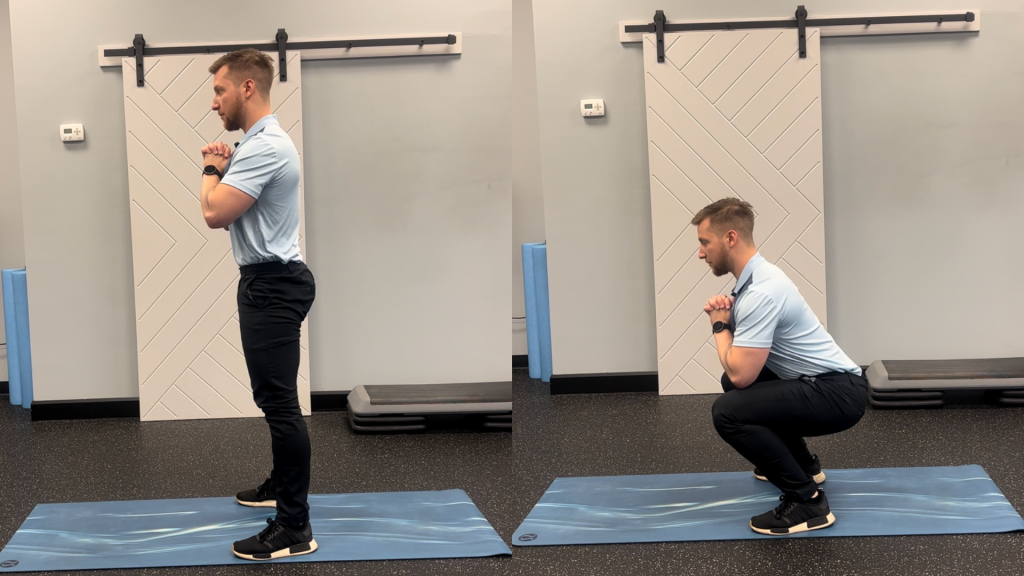
Much like the hinge, squats are an essential movement in our lives. They are involved in everyday movements such as standing up from a chair, and getting in and out of bed. Proper form when squatting ensures safe transitions from these common positions in our everyday life to prevent injuring our lower back.
- For a squat, you will start with feet hip width apart, braced core, and engaged glutes, putting the spine in neutral position.
- Bring your hands together and to your chest. This is your starting position for the squat.
- Bending simultaneously at the hips and knees, push the butt back and keep a strong core.
- Continue descending in the squat until your thighs are parallel to the floor or until elbows touch your thighs.
- Return to the starting position by pushing through your heels and extending your hips and knees.
Key notes: Ensure your knees are tracking in line with your toes and not collapsing inward.
Lunges
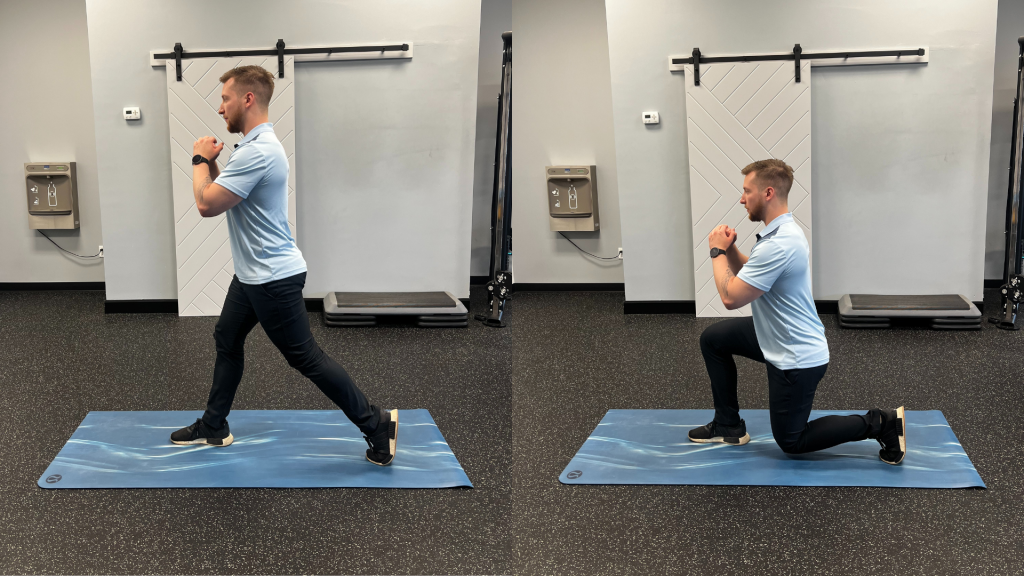
The lunge helps strengthen the legs and core muscles, and are great for improving flexibility and balance, as well as developing coordination. When done properly, lunges simulate running or walking and provide a full-body workout. As they strengthen the stabilizing muscles of the legs and core, it is very useful for injury prevention.
- Begin by standing up straight with feet shoulder width apart.
- Step forward with one foot, making sure your knee is directly above the ankle.
- Lower your back knee towards the ground while keeping your front knee bent at a 90 degree angle.
- Keep a square pelvis by pulling your front hip back while pushing your back hip forward to engage the gluteal, quadriceps and hamstring muscles.
- Push your front heel through the ground to return to starting standing position. Repeat on both sides.
Key notes: Make sure to keep your torso up right with your chest up and shoulders back. Remember to engage the core muscles to maintain balance throughout the movement.
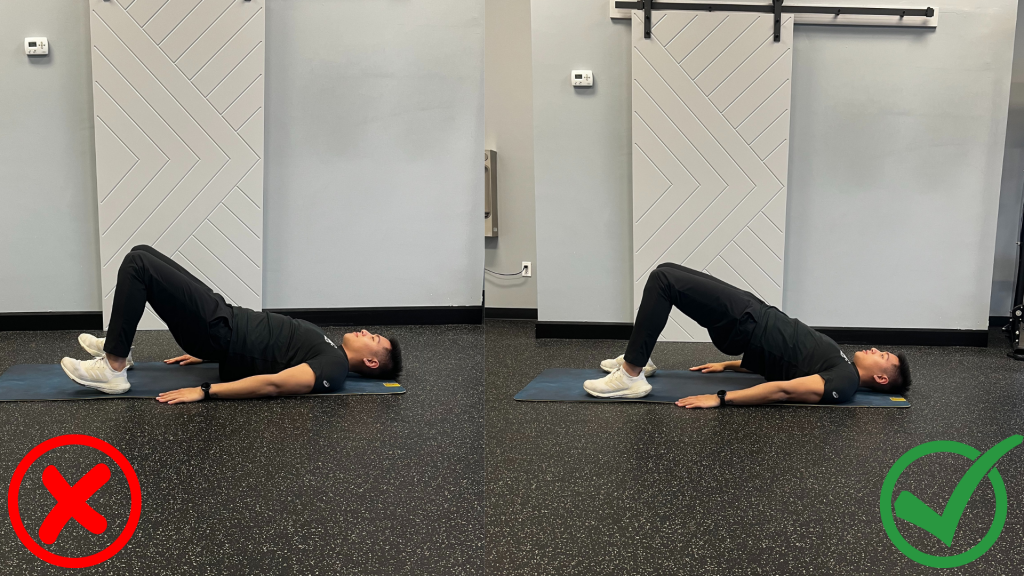
Glute Bridge
The glute bridge is a great exercise for strengthening the glutes, as well as muscles of the lower back. It helps improve posture, reduce lower back pain, and increase strength and stability of the hips and core.
- Start by laying on your back with your knees bent and feet flat on the ground.
- Tighten your glute muscles and lift your hips off the ground until your body forms a straight line from your knees to your shoulders.
- Hold for a few seconds, then slowly lower your hips back down. Make sure to keep a neutral spine.
Downdog and Updog
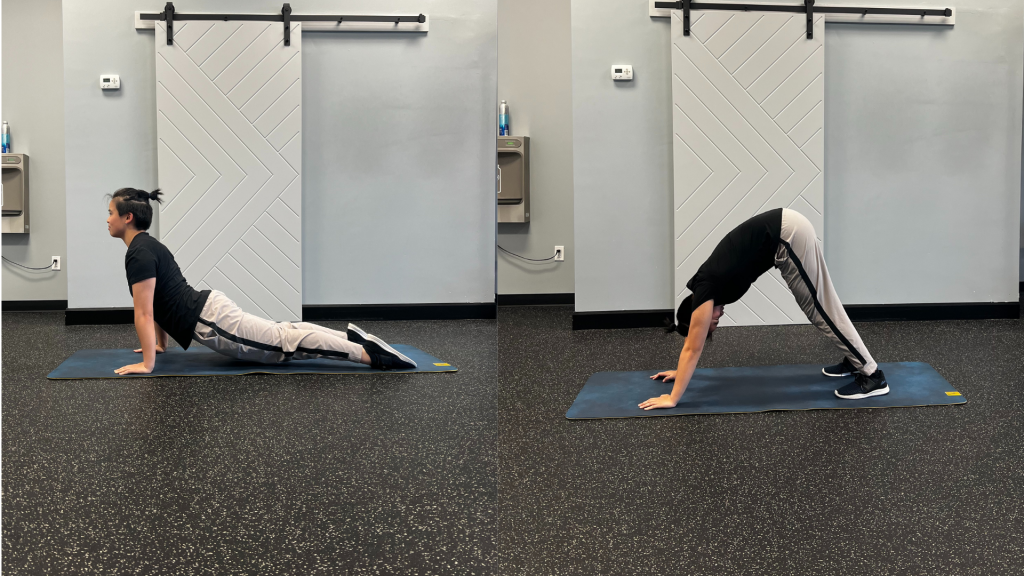
Updog and Downdog are 2 basic yoga poses that can help to strengthen the core, improve mobility and flexibility, as well as improve balance.
Updog:
- Start on your hands and feet, with your wrists in-line with your shoulders and knees under your hips.
- Exhale and press your hands firmly into the floor, curving your spine into an arch as you straighten your arms.
- Lift your chest up towards the sky, without overextending your lower back muscles. Your shoulders should remain over your wrists and your hips parallel to the ground.
- Keep your gaze forward, and hold this position for 10-15 seconds.
- To come out of this position, slowly lower your hips, forearms and head to the ground, and get on your hands and knees. From here, push into the Downdog pose.
Downdog:
- While on your hands and knees, make sure your hands are slightly in front of your shoulders and your knees are directly underneath your hips.
- Engage your core and press your palms flat against the floor/mat.
- Exhale as you lift your hips and press your heels towards the floor.
- Think about keeping your spine as long as possible and try to keep your legs and arms straight. If your hamstrings are very tight, it’s ok to have slightly bent knees to ensure a neutral spine.
- Try to stay in the pose for a few breaths, keeping your head relaxed and your gaze between your feet.
- To come out of the pose, bring your hands back to the mat and slowly lower your hips back to the starting position.
Hamstring Activation
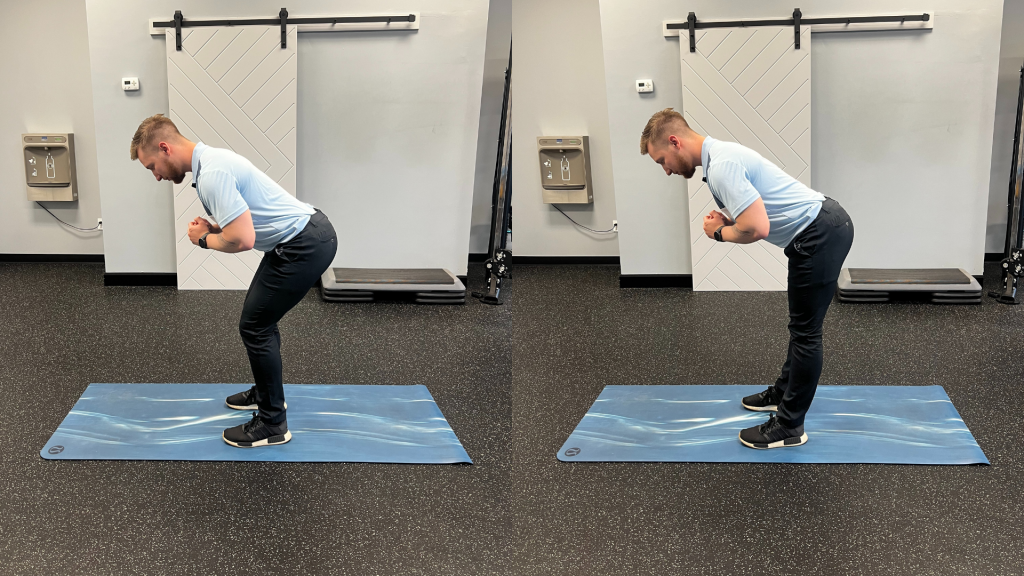
Hamstring activations are a great exercise designed to target the muscles and tendons of the hamstrings. By doing this activation, it helps prevent injuries, provide relief from hamstring pain/tightness, and prevent injuries.
- Get to the bottom of a hinge as described previously.
- At the bottom of this hinge, with knees slightly bent, push your knees back without raising your torso or moving your hips.
- Repeatedly come in and out of this position, while ensuring a stretch of the hamstrings while doing this exercise.
Note: you should feel a big stretch in your hamstrings and back of your knees during this exercise. If it is too much of a stretch, or you are unable to perform this exercise without keeping your upper body still, don’t hinge as deep when in starting position.
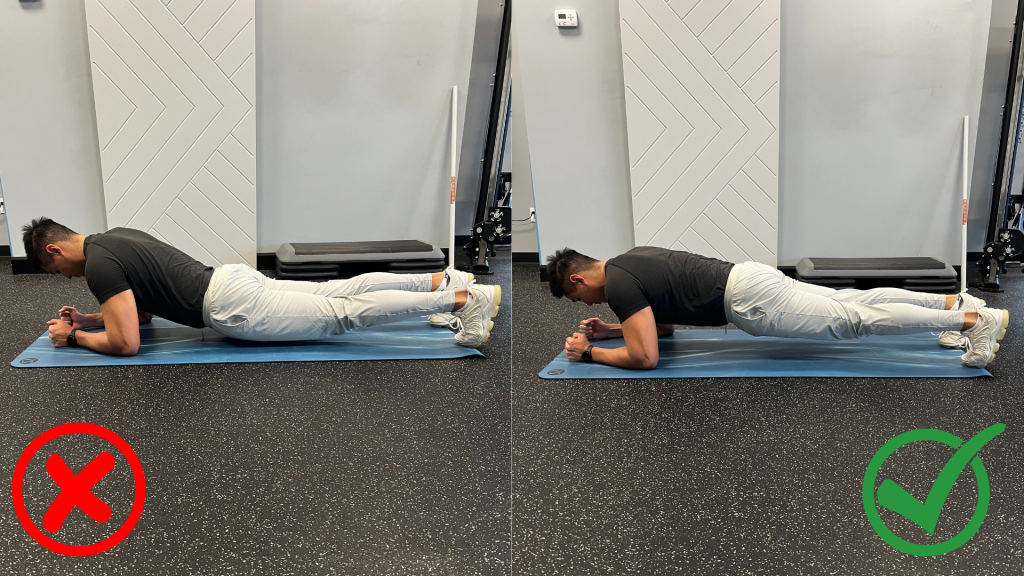
Plank
A plank is one of the most basic yet effective full-body exercises. It engages almost all of the muscle groups in the body, making it an effective way to build and strengthen the core muscles.
- Start in a plank position, with your body facing downwards in a prone position.
- Place your forearms parallel to each other and shoulder width apart with your elbows directly positioned under your shoulders.
- Extend your legs behind you, resting on the balls of your feet with your legs straight back.
- Engage your core muscles by drawing your belly button towards your spine.
- Lift your body off the ground maintaining a straight line from your head to your heels.
- Hold this position for as long as you can, aiming for 20-60 seconds.
Key notes: Remember to control your breathing throughout the movement. Try to keep your neck aligned with your spine by looking down at the floor to avoid straining your neck.
